Don’t fear the Retina: iPad 3, Resolution and Compression for Designers
Apple recently announced that the iPad 3 would have a retina display – double the resolution of iPad 2, and that means four times the pixels on the screen. I’ve seen concern from designers that “the 4x increase in pixels will lead to a 4x consumption in bandwidth, download time and storage space”. This isn’t necessarily true, and isn’t typically true. Let’s start by showing it isn’t always true:
The images shown here were saved from Adobe Photoshop CS5. JPEGs were saved at Quality 5, PNGs at 24-bit. (“Save for Web & Devices” optimization isn’t used in this post unless specified). All images have had embedded color profiles removed (so as not to affect these small file sizes).


So for this special class and size of image, a PNG file is a little more than 2x the size when there are 4x the pixels, and a JPEG is not even 2x the size – more like 1.44x.
So we’ve proved it doesn’t have to be 4x the size (and for brevity’s sake, we’ll use “4x the size” to mean “4x the file size”, “4x the bandwidth”, “4x the download time”, etc.).
Let’s dig deeper to learn more.
A brief history of file and image compression for designers
I’ll try to explain in a simple way how different kinds of file compression work.
If you’re a stickler for accuracy, I’m probably going to get things slightly wrong – the domain is quite technical, and I’m trying to make it clear even for folks who don’t do math. Feel free to comment and correct me.
It wasn’t long after the birth of computers that computer scientists looked for ways to reduce the size of a file. Memory and storage were incredibly expensive (the first magnetic memory boards had ferrite rings hand-strung on conducting wire – this is where we get the term “core” as used in memory).
Run-Length Encoding
One of the first compression algorithms was “run-length encoding” or “RLE”. The goal was to store the instructions to exactly reconstruct the file. Remember that concept – it’s important to what follows.
In a run-length encoding scheme, to compress a sequence of letters (for example) like this:
RRRRRRRRRRRRRRRRRRRRSSSRRRRlsidneupx
The run-length encoder would capture something like “R20S3R4lsidneupx” – that is, instructions to simplify the repetitive data.
Run-length encoding was used in some of the earliest compressed-graphic filetypes, including MacPaint, BMP and TIFF. But while it’s pretty good for something like a 1-bit document with tons of whitespace (think “Fax Machine“, some of whose protocols use RLE), it bogs down pretty quickly when the data changes rapidly, as you can see from the above example.
“Coding” the data for better compression
Everything in any current computing device can be represented completely as a stream of bits. The software, the help text, movies and songs, graphics, copy-protection keys, everything. (This doesn’t hold true for ancient analog computers of the past, and may not hold true for the quantum computers of the future, but for the time being, we’re golden.)
A huge improvement in data compression came about in the 1950s, with “Huffman Coding” – where a set of data could be analyzed for patterns in its bitstream, and the patterns could be represented in a table. This allowed for a “theoretical average compression” of 50%.
Other types of coding followed, that improved on the original idea. You may see “Lempel-Ziv-Welch” and “LZW” file extensions when you set “lossless compression” on a file. PNG files use this kind of coding to compress images losslessly.
For a bitstream like the one sketched above, coding might involve recording:
One of these:
…and three of these:
From these instructions, the file can be recreated exactly. That’s really important for software, which typically will fail if even one bit is wrong. Important for your bank account, or for instructions for launching and running a satellite.
When you see LZW or Huffman Coding used in file compression, the compression is called “lossless compression”. This kind of compression performs really well on text documents, but only so-so on images, as the data in image files can be further from the patterned data this method expects, and closer to randomness.
Think about the stipple in skin-tones you see as you look at a photo at 200%. Think about film grain. Think about the noise in a phone-camera shot at night. None of this data compresses well with Huffman coding.
For images, an exact recreation of the file is not always the most important thing.
Enter Joseph Fourier
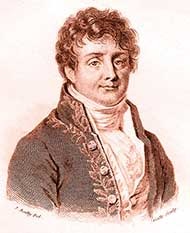
In one of those happy accidents of science, Joseph Fourier was building on the work of others, trying to figure out how to compute heat flow in a metal plate.
Some of the fundamental work in his treatise opened the door to what’s called “Fourier Analysis“. Without getting too deeply into the math, Fourier’s equations showed that you could reproduce any complex waveform by adding together a series of simple waveforms called sine waves.
That’s a gross oversimplification, and that understanding of the theory came later, but still – a really big deal, as it opened the door to much of what’s now called digital signal processing, image and audio compression, MP3s, and thus iPods. (OK, more than that, but still…)
Your image is a signal
Digital signal processing takes advantage of Fourier’s work. For information that can be represented as a waveform (sounds, and strangely enough, images) the waveform is first transformed from the time domain (for sounds) or spatial domain (for images) into the frequency domain. You may be familiar with sound waveforms if you’ve ever opened a sound editing program:
 This is a time-domain signal. You’re probably also familiar with its frequency-domain representation in the iTunes spectrum analyzer:

In what won’t be my last oversimplification, each tower in the spectrum analyzer stands in for one or more “partials” – basically the volume (the “amplitude”) and pitch (the “frequency”) of a sine wave at a place in the image (or time in the sound): its contribution to reconstructing a different signal that looks or sounds very much like the original. This transformation is key to making JPEG, MP3 and many other compression algorithms work.
Note that this is very different from the goal of lossless compression. With this type of compression, called “lossy” compression, the original image can never be reconstructed. But an image that most people wouldn’t be able to tell from the original can be constructed, and it can be stored in a far smaller file.
How JPEG compression works. Sorta.

YCC is similar to (but not the same as) Photoshop’s Lab color mode. I used Lab to stand in for YCC in making my example images.
Because the human eye is best attuned to detail in the Luminance channel, and not as attuned to detail in the color channels, the two C channels are “downsampled” to half the resolution of the original.

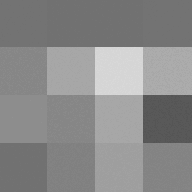
This means that the color resolution will be half that of the luminance resolution. The image is now a little like a tinted black and white image (conceptually), but in practice it works pretty well. In the image here, you can see that it’s pretty brutal to individual pixels, but I’m sure you know from experience that it looks pretty good on a full image.


And we’ve just discarded HALF of the data that made up the original image! That’s already as good as the theoretical average compression of Huffman coding. But we can do better.
JPEG compression next breaks each channel (the Y, CR and CB channels) into 8×8-pixel blocks for processing.
That means the greyscale detail image and both of the color images will be processed separately.
The algorithm will perform a Discrete Cosine Transform (or DCT) on the image to move the data from the spatial domain to the frequency domain (this is where Fourier’s work comes in).
The image is analyzed in vertical and horizontal dimensions to produce a list of partials that can be used to recreate a signal similar to that of the original image.
Here’s where JPEG gets lossy: Quanitization

Real-world photos have a great deal of fine detail that won’t compress well. This includes things like quantum noise from image sensors, film grain, skin stipple, intentional dithering and antialiasing. JPEG removes some of this detail (but not all) by bundling adjacent partials into one single partial that represents them.
This step is called quanitization, and it removes data permanently from the image.
The “Quality” slider affects how aggressively JPEG works to quanitize image data.
The general idea is that pixels of nearly identical value can be identical values in the constructed file – though at this point in the algorithm, we’re working in the frequency domain, not touching individual pixels.
It’s worth noting that JPEG can’t tell the difference between noise and detail. Film grain, sensor quantum noise and the delicate serifs of your favorite typeface are equivalent high-detail parts of the picture in JPEG’s eyes. Redundant detail gets stripped from the file at this point, and it is for this reason that badly-compressed JPEGs look like crap.
This is where optimizers like the “Save for Web and Devices” feature in Photoshop can come in handy. These optimizers resolve some of this “nearly-identical” data into data that will compress better, giving you a better picture for the same compression level at quanitization-time.
Quanitization leaves the frequency-domain image with less data to compress, in the form of fewer partials.
The algorithm next organizes the partials data, and applies both Run-Length Encoding and Huffman Coding to further reduce the size of the compressed data.
OK, so…uh…iPad3? Retina display?
If you’re concerned about “4x the RAM“, since the retina image is uncompressed on the device, yeah, from what I know about it, that’s likely to be true.
But, you have a great deal of control over how the image is stored in a file and transmitted (the file size), via your choice of image, your pre-processing, your choice of a file format (and thus of compression method) and your compression settings.
What’s key to remember from all this is that your image is a signal. In the initial black square images at the start of the article, the signal of the 1″ square image isn’t greatly different from the 2″ square image. And while there are certainly more pixels, making more compressible blocks (and in the JPEG world, more compressible blocks will mean a file that’s somewhat larger), the efficient DCT algorithm and the coding of the compressed data will generally result in less than a 4x increase in file size for a 4x increase in number of pixels.
This does depend entirely on choosing and carefully using JPEG for compression, and depends somewhat on the character of the image. Images with a lot of detail, particularly if you’re intent on rendering that detail finely on the Retina display, will not compress as well (or you may choose not to compress them as much) as images with 1/4 the resolution.
If you’re using PNG instead of JPEG for photographic images without thinking about it (i.e. for images that don’t need an alpha channel), note that the PNG vs JPEG performance on the same 2″ square simple image below costs 6.5 times the data for the same pixel count!
If you’ve got to use the alpha channel, you’re going to be forced to use PNG no matter what you’d like to do. Very simple images with broad, flat areas of the same color are highly compressible in PNG. Noisy, salt-and-pepper images are not. If you want to keep file size down, consider not just your choice of image format, but how you’re going to need to work with it on the device. Forego the Alpha channel if you can, and don’t use PNG unless you need to.
Finally, specially-crafted images (like our black example, or other potential graphically-strong images without dithering, or with uniform repetitive detail) may compress much better than typical photographs, and in certain cases, PNG may do a much better job than JPEG at compressing them.
Sample Imagery
Here’s a look at “4x the pixels” in simple, complex and optimized imagery and in PNG and JPEG file formats.

A look at the numbers tells us that PNG is not going to help us put in a bigger image. The 2″ PNG has nearly 4x the data of the 1″ image.

The Photoshop “Save for Web and Devices” optimizer isn’t going to help us out much either: we’ve saved maybe 15% of file size regardless of the size in pixels. Nothing to sneeze at, but not good enough: the larger image is still nearly 4x the data size.


Standard JPEG does a much better job at compressing the image, and true to our expectations, the 4x image doesn’t take 4x the data: only 2.69 times the smaller one.

Optimization with Photoshop’s “Save for Web and Devices” lets us save a further 8%. It’s possible that on a larger image, the Photoshop optimization would do more for us, but we’re still at about 2.75x the data size of the 1″ image.

On the busy image, again, the PNG image compression yields an image that has nearly 4x the data of the smaller one.

Straightforward JPEG compression gives a difference of 3.29 times the data for 4x the pixels for this busy image.

And as before, optimization only helps a little: the large image is 3.31x the data in the smaller.
I experimented to see how much I could reduce the file size of the JPEG image with a small sacrifice in quality. This image is nearly 10K lighter than the optimized JPEG image above, with a .25 blur and a quality setting of 0. Not every image will withstand this treatment, of course.
This work holds up on photographic images at higher resolution: I took a full resolution image at iPad 3 size from the two images we’ve been using and used “Save for Web and Devices” on both, and saved versions at iPad 2 size as well (using the scaling function in “Save for Web and Devices”).
Results: For both images, there’s about 3 times the data in the large image as the small, but in both cases, JPEG data is significantly smaller than equivalent PNG files.
The last word
Pay attention to what you’re doing in selecting images, in pre-processing them, in choosing a compression method or file format. It does matter to the size of your file. But there’s no hard and fast rule that means “4x the file size for 4x the pixels”.
